How to Create Realistic Roads for Model Railways
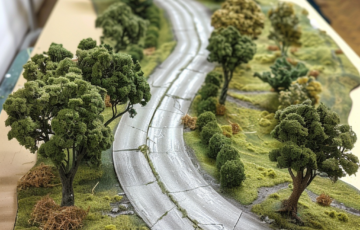
How are the industrial giants and passengers going to move around your railway layout once they are at the railway terminus? Of course, completing the rail journey is usually only half the journey. The other half requires trucks, buses, or cars to get them to their final destination. Creating a road for a model railway layout can be as easy as using white paint and marking a dotted line down a grey track but here we will look at ways to create some realistic roads for model railways.
There are various methods for creating sections of roads for your model railway.
- Ready-made printed road sections. Most hobby stores stock these and they are usually made from rubber or plastic and come in a variety of styles, including paved roads, dirt roads, and cobblestone streets.
- Decal Sheets. Printed onto thin sheets of card and usually with adhesive backing, these decal sheets can be cut to size and stuck onto your layout.

- Create your own roads for your model railway. There are different materials that bring out great and realistic results. Materials such as Sculptamold, polymer clay and foam board can all be worked in a way that makes realistic looking roads.

Creating Roads for Model Railways with Clay
Polymer clay is fantastic modelling material that can be used to create a variety of different objects on a model railway. From hills to roads, below we will detail the method to create realistic roads for your model railway.
- Prepare the area on your layout where you want the road. Ensure it is clean from dust and any other debris. Make sure there are no other objects near where the clay will be laid as it can get messy. Have everything to hand, kitchen towel, the clay, a sharp blade, and a clay roller.
Making Model Roads with Clay
2. Condition the clay. Polymer clay needs to be prepared before it can be used. To do this, simply knead the clay between your fingers until it is soft and pliable. Clay from a previously opened package may need a small drop of water to help it become soft and usable.
3. Cut the clay into the length of road you need. Place it into the area of your layout and gently roll it into thin strips to fit the road. Using a sharp blade cut off the excess clay.

4. Shape the clay into your desired road surface. You can model various types of surfaces using different techniques. For a rough asphalt surface, running a wire brush with thin bristles over the top can recreate that effect. For concrete, take a single drop of water and gently rub your finger over the surface to make it perfectly smooth. Finally for cobblestones, use a tool to press the pattern into the surface of the clay. Check out our page for creating cobblestone roads with clay here.
5. Allow the clay to harden as per the instructions. With polymer clay this usually involves leaving it to dry by itself in place.
6. Paint the clay the appropriate colour for the surface you are modelling.
With some patience and creativity, polymer clay can really bring a model railway to life adding a sense of depth and realism. No matter which method you choose, be sure to pay attention to the size and scale of your roads in relation to the scale of model railway on your layout. Check out our page on model road sizes of different scales here to help you get the accuracy spot on.