Hills for Model Railways
As model railway enthusiasts, we often strive to create realistic landscapes that enhance the charm and authenticity of our miniature worlds. One crucial aspect of this endeavour is crafting lifelike hills and rocky formations that seamlessly blend into the scenery. In this article, we'll explore a step-by-step approach inspired by the techniques demonstrated in a recent video tutorial, aimed at empowering hobbyists to elevate their model railway layouts with captivating hills and rocky terrain.
Building the Foundation:
The foundation of any successful model railway landscape lies in sturdy yet lightweight materials that allow for easy manipulation and customization. One of the best ways to achieve this is the use of lightweight polystyrene as the primary material for constructing hills. This versatile material serves as an excellent base due to its ease of cutting and shaping.
- Polystyrene Construction: Begin by cutting and shaping the polystyrene to form the desired contours of the landscape. Secure the pieces in place using adhesive, ensuring a solid foundation for the hills.

2. Paper Mache Application: Next, apply a layer of paper mache over the polystyrene to add texture and durability to the landscape. The paper mache serves as a bonding agent, reinforcing the structure of the hills.
3. Weighted Compression: To prevent warping or shifting during the drying process, strategically place weights on the landscape while the glue and paper mache set. This step ensures a stable foundation for further detailing.
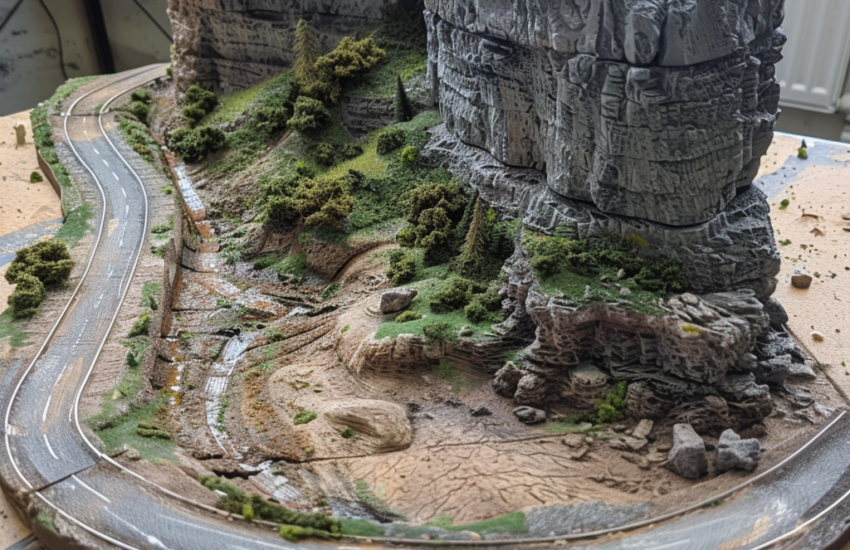
Painting Plaster Rocks:
Rocks and rocky outcrops are essential features of any natural landscape, adding visual interest and realism to the scenery. Follow these steps to create a more realistic looking landscape.
- Base Coat Application: Begin by applying a base coat of gray paint to the plaster rocks, mimicking the color of natural rock formations.
- Color Variation: Create depth and realism by dabbing random dots of reddish-brown and dark green paint onto the rocks. This variation in color simulates natural weathering and mineral deposits.
3. Blending Technique: Use a water brush to blend the colors seamlessly, achieving a natural gradient effect across the rock surfaces.
4. Final Touch: Apply a black wash over the painted rocks to tie all the colors together and enhance the texture and depth of the rock formations.
Adding Details and Texture:
Once the basic landscape features are in place, it's time to add intricate details and texture to bring the scene to life.
- Filler Application: Use filler to secure the painted rocks in place and adjust their positioning as needed. This versatile material allows for easy customization and blending with the surrounding terrain.
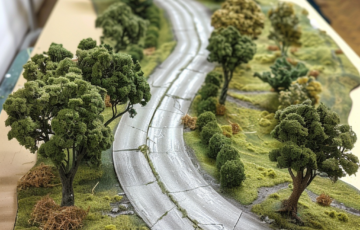
- Verdant Verge: Create a verdant verge alongside the railway track using PVA glue and dirt sourced from the garden. This naturalistic detail adds depth and realism to the scene, enhancing the overall aesthetic appeal.

Enhancing with Static Grass:
To add the finishing touch to your model railway landscape, consider incorporating static grass for lush, realistic vegetation.
- Layering Technique: Begin by applying a base layer of 2mm static grass over a coat of PVA glue, ensuring even coverage across the desired areas.
- Variation and Depth: Layer longer 4mm static grass over the base layer to add variation in height and texture. Additionally, use layering spray to incorporate different shades of grass, such as 6mm dead grass and autumn grass, for added realism.
3. Detailing: Enhance the scenic detail by adding small tufts of grass along the dirt verge, creating a seamless transition between the railway track and the surrounding landscape.
4. Protective Measures: Protect the painted rocks by covering them with masking tape during the static grass application process, ensuring they remain pristine and free from stray grass fibers.

By following these detailed steps you can elevate your layout with captivating hills, realistic rock formations, and lush vegetation. Whether you're a seasoned hobbyist or a newcomer to the world of model railways, incorporating these techniques will undoubtedly enhance the charm and authenticity of your miniature masterpiece.
Remember, the journey of creating a model railway layout is as rewarding as the finished result. Embrace experimentation, creativity, and attention to detail as you bring your miniature world to life, one hill at a time.